List of some most useful Nuke Hotkeys in the Node Editor, Viewer, and Properties panel:
In the Node Editor
-
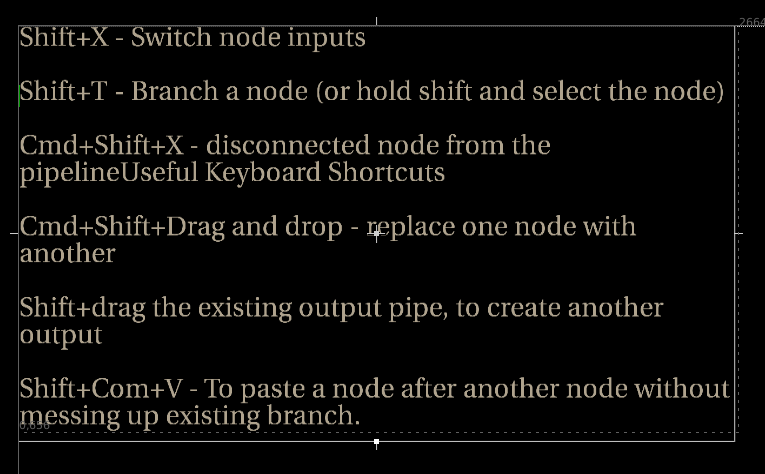
Shift+X – Switch node inputs
-
Shift+T – Branch a node (or hold shift and select the node)
-
Cmd+Shift+X – disconnected node from the pipeline
-
Cmd+Shift+Drag and drop – replace one node with another
-
Shift+drag the existing output pipe, to create another output
-
Shift+Com+V – To paste a node after another node without messing up existing branch.
-
123456789 on the keyboard . To position your object. For small amount hold down cmd.
-
Alt+P – Turn the node’s thumbnails on/off.
-
Select a node and hold down command key while choosing new node to replace it with the old one.
-
Cmd+double click on a node – open its properties in a floating panel.
-
/ – Search in the node editor
In the Viewer Window
-
Ctr+Alt+Drag -to change the pivot point position.
-
Y . View the luminance.
-
Ctrl/Cmd+P . Switch to proxy mode.
-
To sample pixels from the Viewer, click on the color swatch to the right of the control you want to set. The eye dropper icon appears. In the Viewer:Ctrl/Cmd+click to sample a single pixel from the node’s output.Ctrl/Cmd+Shift+drag to sample a region of pixels from the node’s output.Ctrl/Cmd+Alt+click to sample a single pixel from the node’s input while viewing the its output.Ctrl/Cmd+Alt+Shift+drag to sample a region of pixels from the node’s input while viewing the its output.
-
With the interactive 3D camera view mode you can change the camera or light values according to your movement in the Viewer. You can activate the interactive mode by Ctrl/Cmd+clicking the 3D view lock button. When the interactive mode is on, the 3D view lock button turns green. In order to activate the interactive mode, you need to have a Camera or a Light node selected in the dropdown on the right side of the 3D view lock button.When the interactive mode is on, you can use the plus (+) and the minus (-) keys to change the translate values of the camera or light you’ve selected. When the interactive mode is off, these keys zoom your view in and out.
In the Properties Panel
-
Cmd+drag properties from one node to another will creates an expression link.
-
Shif+drag properties from one node to another will copies the curve itself with all its keyframes.