In this post I’ve selected some parts on camera tracking from the Nuke User Guide manual and added some pictures and bolded some parts in order to make it easier to remember how to work with this node.
Step 1
Seeding and setting track parameters
Seeding Tracks
It means choosing specific points that you need them to be tracked, if any. By seeding these points you tell CameraTracker that use this points while tracking in addition to 150 points it puts into the shot by default.
Right click anywhere you want to be tracked in the footage and select Tracks > Seed track
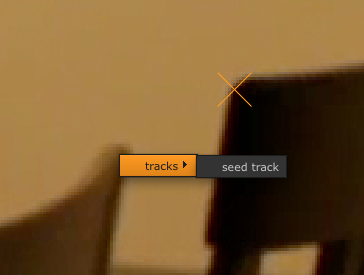
You can center the Viewer to a particular track or several tracks. This way you can see how well your tracks stick to the image. Turn centering off by right-clicking anywhere in the Viewer and selecting center viewer off.
Set the Tracking Parameters
![]()
Detection Threshold
If you put it to 0 it means don’t pre-analyze the footage and just throw the points over the footage.
Feature Separation
To spread features evenly over the image at even distances,enter a high feature separation value. The safe range for Feature Separation is between 8 and 20.
Refine Feature Locations
If you activate this, CameraTracker finds the closest corner point in your footage and lock the feature point to it.
Minimum Length
You might find a lot of short tracks cropping up in long sequences with slow camera movement. Set a threshold value for the minimum track length to reject short tracks.
Track Threshold
It is useful for fast camera movement. Set this to tell Nuke when throws out the track point. For most project the default 0.7 is useful. If you reduce it, it won’t throw out the track point if it is short. But at the same time reducing it will cause lower tracking quality and more tracking data.
You can adjust this value to test whether the track is reliable. This controls how similar features look over a number of frames.
Tip!
- Sometimes sequences generate very long tracks. Long tracks are good, as this indicates a reliable 3D point. However, if tracks are too long, the pixels that are tracked in the image can end up drifting from the underlying 3D point. When this happens, the track will be rejected in the solve as the error between the 3D point and the 2D track becomes large. To stop tracks getting too long, just increase the Track Threshold value.
- If you need the points be spread out evenly all over the scene you can set the Detection Threshold to 0 and set the Feature Separation to for example 20. When you do this, it is better to increase the Number of features to make sure you have enough points on your desired areas.
- If you put Feature Separation and Detection Threshold to 0, Nuke will find the highest contrast areas to put the points.
- Anytime you crank up the Number of Features you better to lower the Feature Separation.
Track smoothness
Increase the smoothness value to remove the tracks that glitch over time. It helps when the camera is very shaky.
Track Consistency
Adjust this to prevent poor tracks in complex scenes. increase this value to ensure track motion is locally consistent. It looks at the similar track around itself to make sure they are moving in similar fashion.
Track Validation
- Free Camera – Usually works well.
- None – When you need a large number of tracks and need to keep all tracks in the image.
Right-click the tracker points that you are happy with (the ones that cover larger frame number) and select tracks>extract user track. Now you have two dimensional information in the Tracking tab which you can use them to attach to corner pin or anything.
You can also export tracking data from Tracking tab too and import them to another CameraTracker node later.
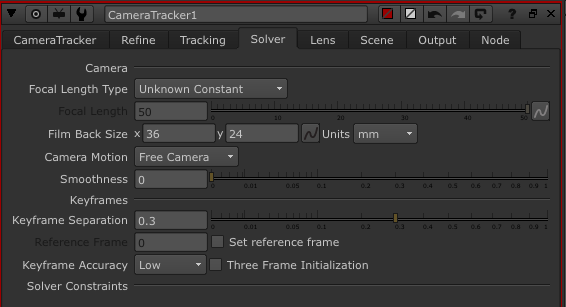
Step 2
Set parameters in Solver tab
![]()
Camera Motion
- Linear Motion – Select this if the camera has a straight, linear path.
- Planar motion – Select this if the camera has a flat path, moving in a two-dimensional plane only.
Smoothness
Increase the value to add weighting to the camera path and create a smoother result.
Keyframe Separation
Use a high separation to spread key frames out in long sequences with small camera movements.
Use a low separation to generate more key frames for fast camera move.
Tip!
- When solving a sequence from a digital camera, the distance between camera positions can be relatively large already, so try reducing the Keyframe Separation to generate more keyframes. Keyframes allow the solver to use a subset of frames where the camera positions are relatively widely spaced. This ensures that 3D positions can be defined more reliably(in triangulation).
Set Reference Frame
This should be a frame where there is a large number of tracks distributed over the image with a variation in depth.
keyframe Accuracy
A higher accuracy takes longer time to solve but it can improve the result when you are working with a long sequence.
Three Frame Initializing
Switch to using three key frames rather than two to initialize the solve.
Step 3
Track Features
![]()
2D Points
To view the circle around the reprojected points in the 2D Viewer, and the error between the tracks and the points.
3D Marker
Add cone shaped marker in the 3D Viewer. Change their size in Marker Scale.
Key Tracks
View only the key tracks which are visible in your keyframes. If your point cloud is very dense, you can reduce the size of it by only viewing the tracks visible in your key frames. That way you can view less and more accurate 3D points.
link output
Check to create a link between CameraTracker node and the node connected to its output. So that when the solve updates, the Cameras and points are updated to.
Delete Auto-tracks
Sometimes you may want to use CameraTracker for just creating a few user tracks and a solved camera. For example, you might want to create a solved camera and use with the Modeler node to create 3D faces from your 2D footage. In this case, you can get rid of the automatically created tracks and 3D points at this stage by clicking Delete Auto-tracks in the CameraTracker node properties panel.
Step 5
Solving the camera and creating scene
On CameraTracker node click on:
- CameraTracker> CameraTracker> Solve
- CameraTracker> CameraTracker> Create Camera
- CameraTracker> CameraTracker> Create Scene
- Add Scanline Rendere node and put the point cloud over the image.
Tip!
If you have bumps in your track after solving the camera:
- Go to Output tab in CameraTracker node and open translate or rotate in curve editor and remove the bumped keyframe.
- You can go to Solver tab and set the Keyframe Accuracy to High. then got to Refine tab and press Recalculate Solve.
- You can check Three Frame Initialization in the Solver tab.
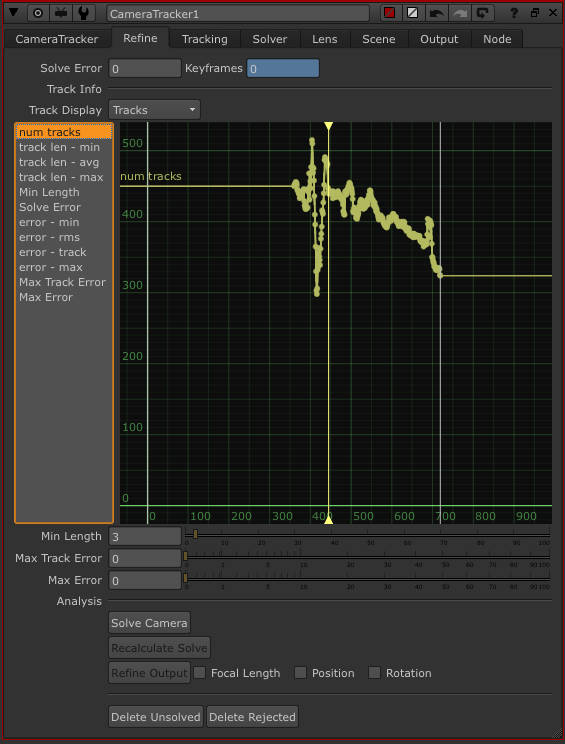
Step 4
Refine
![]()
num tracks
Shows the number of tracked features at each frame.
Min Length
It helps to get rid of bad tracks. It rejects any frames that is less than the frame number you give it. The colour of rejected frames becomes red in the Viewer, then press Delete Rejected to delete them.
Increase the minimum length threshold to reject short tracks. You might find a lot of short tracks cropping up in long sequences with a slow camera movement.
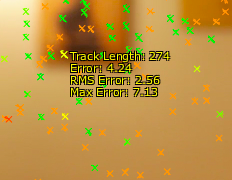
Max Track Error
Reduce this threshold to reject tracks based on RMS reprojection error.
Max Error
Reduce this threshold to reject tracks with a large reprojection error in isolated frames.
Tip!
By tweaking the Max RMS Error and Max Error, you can always go back and manipulate your track even after you create your scene. press solve camera bottom again after tweaking.
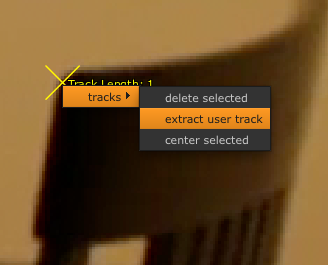
You can delete features that have been tracked.Right-click on the selected track(s) and select Tracks > Delete selected.
If you’ve already solved the camera, created a scene and removed and edited points in it, you can just click Solve Camera again, and the scene will automatically update.
Recalculate Solve
When you press Solve Camera it uses all track points. Even the red ones. So when you manipulate Max Track Error or Max Error it still doesn’t consider them unless you click Delete Rejected and press Solve Camera. But if you don’t want to delete rejected keyframes, then you can use Recalculate Solve.
Refine Output
This starts with the current camera solve and uses the inlier tracks (that is the tracks that have not been rejected by the thresholds) to fine tune focal length, camera position or camera rotation (or a combination of these). You can manually edit the camera solve first on the Ouput tab, then choose:
Focal Length
Check to refine the camera’s focal length.
Position
Check to refine the camera position.
Rotation
Check to refine the camera rotation. For example, you might want to smooth the camera path then use Refine Output to update the camera rotation to match the camera path.
Delete Unsolved
Click to permanently delete tracks for which 3D points could not be calculated in the solve.
Delete Rejected
Click to permanently delete tracks that have been rejected by the thresholds.
Step 6
Set the right axis and point cloud size
After you’ve created your scene, you can use the transform controls on the Scene tab to fine-tune the result. All the settings on this tab are animatable.
![]()
Right Click on a tracker point on the ground and select ground plane>set to selected to set the 3D scene ground plane to that point. you can do this couple of time on different track points during the shot. By doing this you will set your point cloud right on the ground plane.
![]()
Right Click on a good track point and select ground plane> set origin. This will centre that point in the 3D viewer ground plane.
Tip!
Right Click on one of the tracker point on the ground and select create>card. Rotate it 90 degree and use it as a reference for setting your ground well. Then go to CameraTracker>Scene>Translate and put the card node in the right perspective.
Step 7
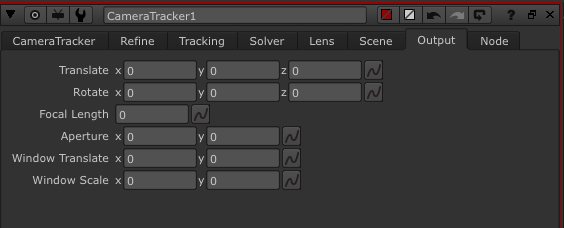
Adjusting the visual camera
On the Output tab, you can adjust the controls for the virtual camera created by the CameraTracker node. In most circumstances, you shouldn’t need to touch these at all as they provide additional ways to setup the virtual camera which CameraTracker automatically creates.
![]()
Tip!
You might want to use the virtual camera output settings in a case, where you want to smooth a noisy solve. You can use the Curve Editor to see your values and right-click Interpolation > Smooth to smooth them. You can also smooth the Focal Length result on the Output tab then copy over to the Solver tab to perform a Known focal length solve. This way you’re guaranteed to get a smooth change in focal length in your solve.
Trouble Shooting the Solve
- If you’re having problems getting the results you want with your solve, there are a few things you can try:
- If you have a tricky sequence which simply doesn’t seem to solve, your best course of action might be to reduce the keyframe separation value on the Solver tab to 0.1, and then try solving for different reference frames.
- You can also try using Three frame initialization and a high keyframe accuracy value, but note that this process is rather slow.
- If your camera does solve but drifts away from where it should be, then using long user tracks could help you to lock down the camera. You can add and import user tracks on the Tracking tab.
- Solving long, slow sequences can introduce camera jitter. In this case you might try setting the camera Smoothness on the Solver tab to 0.1 to smooth out the jitter on the camera path.
Exporting a Point Cloud
Create a WriteGeo node and attach it to your CameraTrackerPointCloud node.
In the WriteGeo controls, select fbx in the file type drop-down, and make sure you have the point clouds box checked.
Press Execute.
Comments
4 responses to “Camera Tracking in NukeX – CameraTracker node”
Your style is unique compared to other people I have read stuff from.
Thank you for posting when you’ve got the opportunity,
Guess I will just bookmark this page.
Thank you so much for your comment. I really appreciate that.
Great article.
Thank you Nina!